Installation instructions for part #48435

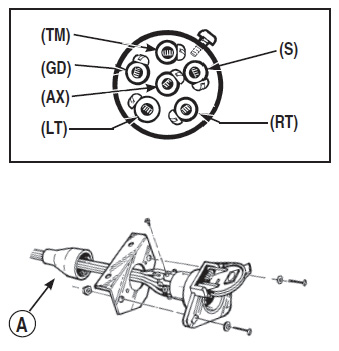
WIRE IDENTIFICATION
White.................... Attach to Ground (GD)
Brown................... Tail / Park (TM)
Yellow................... Left Turn (LT)
Green.................... Right Turn (RT)
Red....................... Auxiliary (A)
Blue...................... Electric Brake (S)
1. Loosen the set screw (A) on the connector and remove the socket from the housing. Route wiring through socket housing. Strip wires 1/4” and tightly secure them to socket terminals. Align socket keyway with housing key and insert socket into housing. Tighten set screws.
NOTE:
Locate wires on vehicle by function only. Color coding is not standard with all manufacturers.
____________________________________________________________________________
IDENTIFICACIÓN DE LOS CABLES
Blanco.................. Conecte a Tierra (GD)
Café...................... Las Luces Traseras (TM)
Amarillo............... Direccional Izquierda (LT)
Verde.................... Direccional Derecha (RT)
Rojo...................... Auxiliar (AX)
Azul...................... Eléctrico del Freno (S)
1. Afloje el tornillo (A) del conector y saque el enchufe. Dirija los cables a través del conector. Desforre los cables 1/4 de pulgada y asegúrelos firmemente a las terminales del enchufe. Alínee la ranura del enchufe con la del conector y introduzca el enchufe dentro del conector. Ajuste el tornillo.
NOTA:
Localice los cables del vehículo por su función solamente. El código de colores no es el mismo para todos los fabricantes.